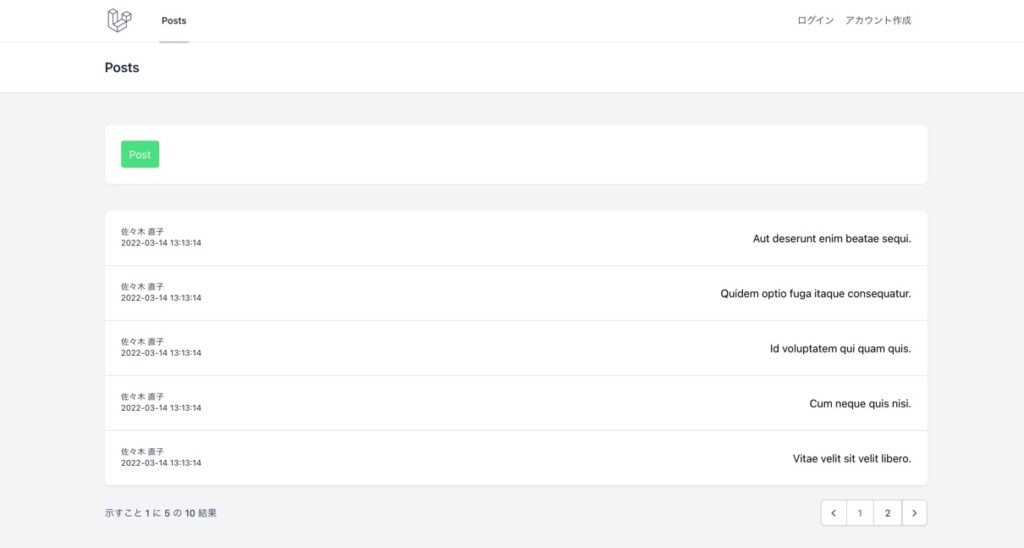
マイグレーションとシーダーを実行して、Use モデルとPost モデルそしてダミーデータがすでに作成してあります。Post を取得して、一覧表示リストを作成していきます。
親記事
Dockerで環境構築して Laravel 9で CRUD 機能を作る
2022年03月15日
Laravel前記事
Laravel9 投稿 CRUD 機能を作成 〜 ルーティングを作成
2023年01月10日
Laravel環境
- macOS
- Laravel v9.0.2
- Docker 20.10.12
投稿リスト
PostControlle の list メソッドに書いていきます。
リレーション
Post モデルには、User モデルの主キーのid に関連付けされている、外部キーの user_id が保存してあります。Post モデルから関連するUserモデルを使いたいときには、1対多のリレーション hasMany の逆の関係 belongsTo を定義します。
class Post extends Model
{
    use HasFactory;

    public function user() {
         return $this->belongsTo(User::class);
     //     return $this->belongsTo(User::class, 'foreign_key', 'owner_key');
    }
}
6: Postモデルで belongsTo(User::class) 外部キーのuser_idが User モデルの主キー id と関連付けされます。
リレーションメソッド名の userを使用して user + _id が外部キーとして自動的に決まります。
7: 外部キーに user_id を使わないなら、第二引数に値を渡します。
7: 主キーのid 以外のidを使いたいなら、第三引数に値を渡します。
use App\Models\Post;

public function list()
{
     $posts = Post::orderByDesc('created_at')
          ->with('user')
          ->paginate(5);
     return view('posts.list', ['posts' => $posts]);
}
4: リレーションを定義したモデルを指定、効率が良くなりクエリの問題が軽減されます。
3-5: Postモデルから作成日が新しい方から5つの投稿を取得、paginate() を使ってページネーションを実装します。
6: データと投稿一覧ページを返します。
ビューを作成
投稿一覧ページ resources/views/posts/list.blade.phpファイルを作成します。
<x-app-layout>
     <x-slot name="header">
          <h2 class="font-semibold text-xl text-gray-800 leading-tight">
               {{ __('Posts') }}
          </h2>
     </x-slot>

     <div class="py-12">
          <div class="max-w-7xl mx-auto sm:px-6 lg:px-8">

               <div class="bg-white shadow-sm sm:rounded-lg mb-10">
                    <div class="p-6 flex items-center ">
                         <a href="{{ route('posts.create') }}">
                              <button class="rounded bg-green-400 text-white py-2 px-3">Post</button>
                         </a>
                    </div>
               </div>

               <div class="bg-white shadow-sm sm:rounded-lg ">
                    @foreach ($posts as $post)
                    <div class="p-6 border-b border-gray-200 flex items-center justify-between">
                         <div class="flex flex-col ">
                              <span class="text-xs text-gray-800">{{ $post->user->name }}</span>
                              <span class="text-xs text-gray-800">{{ $post->updated_at }}</span>
                         </div>
                         <a href="{{ route('posts.show', $post->id) }}">
                              <p class="text-md">{{$post->title}}</p>
                         </a>
                    </div>
                    @endforeach
               </div>

               <div class="my-5">{{$posts->links()}}</div>

          </div>
     </div>
</x-app-layout>
20-30: Posts の値をもとに投稿一覧のリストを作成
23: Userモデルとリレーションを定義しているので、{{ $post->user->name }} でUserモデルの値を使用することができます。
33: {{$posts->links()}} でページネーションを実装することができます。
ナビゲーションバーを変更
resources/views/layouts/navigation.blade.phpファイルに付け加えます。
<pre class="line-numbers" data-line="" data-lang="PHP"><code class="language-php"><!-- 省略 -->

<!-- Navigation Links -->
<div class="hidden space-x-8 sm:-my-px sm:ml-10 sm:flex">
     <x-nav-link :href="route('posts')" :active="request()->routeIs('posts')">
          {{ __('Posts') }}
     </x-nav-link>
     @auth
     <x-nav-link :href="route('dashboard')" :active="request()->routeIs('dashboard')">
          {{ __('Dashboard') }}
     </x-nav-link>
     <x-nav-link :href="route('user.profile')" :active="request()->routeIs('user.profile')">
          {{ __('Profile') }}
     </x-nav-link>
     @endauth
</div>

<!-- 省略 -->

<!-- Responsive Navigation Menu -->
<div :class="{'block': open, 'hidden': ! open}" class="hidden sm:hidden">

     <div class="pt-2 pb-3 space-y-1">
          <x-responsive-nav-link :href="route('posts')" :active="request()->routeIs('posts')">
               {{ __('Posts') }}
          </x-responsive-nav-link>
          @auth
          <x-responsive-nav-link :href="route('dashboard')" :active="request()->routeIs('dashboard')">
               {{ __('Dashboard') }}
          </x-responsive-nav-link>
          <x-responsive-nav-link :href="route('user.profile')" :active="request()->routeIs('user.profile')">
               {{ __('Profile') }}
          </x-responsive-nav-link>
          @endauth
     </div></code></pre>
5-7: Navigation Links に追加
24-26: Responsive Navigation Menu に追加

一覧表示リストができました。
次の記事
Laravel 9 投稿CRUD 機能を作成 〜 投稿を保存
2023年01月10日
Laravel


