Laravelのメール通知を使って、ユーザー登録後の完了メールを作成する方法を見ていきます。
通知
親記事
Dockerで環境構築して Laravel 9で CRUD 機能を作る
2022年03月15日
Laravel環境
- macOS
- Laravel v9.0.2
- Docker 20.10.12
メール通知機能を作成
Registeredという名前で通知機能を作成していきます。sailを使用している場合は下のコマンドを入力します。
php artisan make:notification Registered --markdown=mail.registered

sail artisan make:notification Registered --markdown=mail.registered
Notifications/Registered.phpファイルとviews/mail/registered.blade.phpファイルが作成されます。
通知を登録
通知を登録するために、Notifiableトレイトのnotifyメソッドを使用します。
NotifiableトレイトがUserモデルにデフォルトで含まれています。ユーザー登録後の通知なので、Userモデルで使用していきます。
<?php

namespace App\Models;

use Illuminate\Contracts\Auth\MustVerifyEmail;
use Illuminate\Database\Eloquent\Factories\HasFactory;
use Illuminate\Foundation\Auth\User as Authenticatable;
use Illuminate\Notifications\Notifiable;
use Laravel\Sanctum\HasApiTokens;
use App\Notifications\Registered;

class User extends Authenticatable
{
     use HasApiTokens, HasFactory, Notifiable;

     //略

     public function registered($val)
     {
          $this->notify(new Registered($val));
     }
}
8,14: Notifiableトレイトを使用します。
10, 18-21: notifyメソッドにインスタンスを引数に指定します。
メール通知に後々ユーザーネームを使いたいので、$val を渡しておきます。
メッセージを作成
メッセージ内容に登録したユーザーの情報を使うようにします。ユーザー情報は、呼び出しの引数で受け取ります。
<?php

namespace App\Notifications;

use Illuminate\Bus\Queueable;
use Illuminate\Contracts\Queue\ShouldQueue;
use Illuminate\Notifications\Messages\MailMessage;
use Illuminate\Notifications\Notification;

class Registered extends Notification
{
    use Queueable;
    public $user_name;
    /**
     * Create a new notification instance.
     *
     * @return void
     */
    public function __construct($user)
    {
        //
        $this->user_name = $user;
    }

    //略

    /**
     * Get the mail representation of the notification.
     *
     * @param  mixed  $notifiable
     * @return \Illuminate\Notifications\Messages\MailMessage
     */
    public function toMail($notifiable)
    {
        return (new MailMessage)->markdown('mail.registered', [
             'user_name' => $this->user_name
        ]);
    }

    //略
}
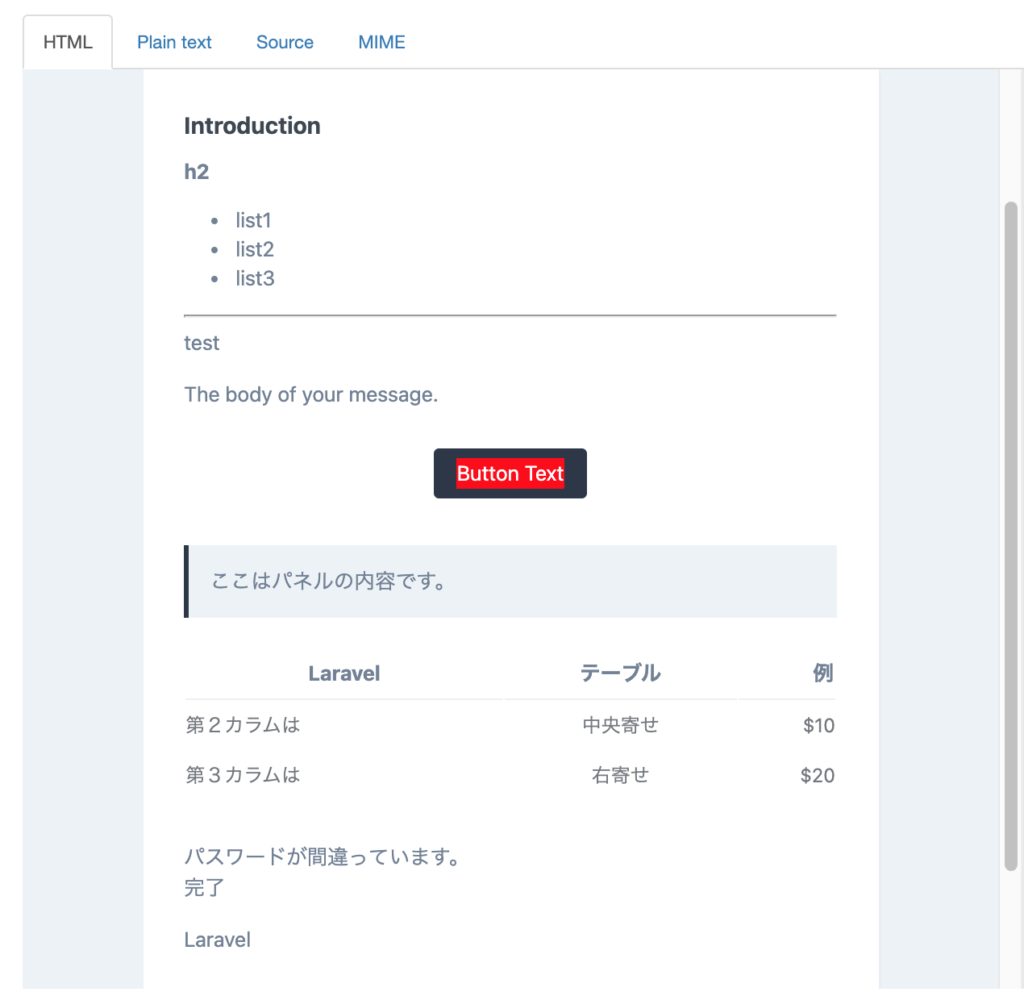
受け取ったユーザー情報をビューに渡します。views/mail/registered.blade.phpファイルを変更して見た目を作ります。メッセージの作成にはMarkdown記法を使うことができ、簡単な記法でhtmlタグを生成することができます。その他ボタン、パネル、テーブルなどのコンポーネントを使うことができます。
@component('mail::message')
# Introduction
## h2

- list1
- list2
- list3

---

{{ $user_name }}

The body of your message.

@component('mail::button', ['url' => ''])
Button Text
@endcomponent

@component('mail::panel')
ここはパネルの内容です。
@endcomponent

@component('mail::table')
| Laravel | テーブル | 例 |
| ------------- |:-------------:| --------:|
| 第2カラムは | 中央寄せ | $10 |
| 第3カラムは | 右寄せ | $20 |
@endcomponent

{{ __('auth.password') }} <br>
{{__('Done.')}}<br>

{{ config('app.name') }}
@endcomponent
2-9: Markdownの記法、見出し、リスト、境界線など簡単に表記することができます。
11: 引数を使用
15,19,23: コンポーネント
30: lang/authファイルのpasswordに指定している文字列を呼び出し
31: lang/jsonファイルのDone.に指定している文字列を呼び出し
ユーザー登録後に呼び出す
laravel Breezeで認証を作成してあるので、app/Http/Controllers/Auth/RegisteredUserController.phpファイルに、ユーザー登録をするコードが書かれているので、こちらに追加していきます。
<?php

namespace App\Http\Controllers\Auth;

use App\Http\Controllers\Controller;
use App\Models\User;
use App\Providers\RouteServiceProvider;
use Illuminate\Auth\Events\Registered;
use Illuminate\Http\Request;
use Illuminate\Support\Facades\Auth;
use Illuminate\Support\Facades\Hash;
use Illuminate\Validation\Rules;

class RegisteredUserController extends Controller
{

   //略

    public function store(Request $request)
    {
        $request->validate([
            'name' => ['required', 'string', 'max:255'],
            'email' => ['required', 'string', 'email', 'max:255', 'unique:users'],
            'password' => ['required', 'confirmed', Rules\Password::defaults()],
        ]);

        $user = User::create([
            'name' => $request->name,
            'email' => $request->email,
            'password' => Hash::make($request->password),
        ]);

        event(new Registered($user));

        $user->registered($request->name);

        Auth::login($user);

        return redirect(RouteServiceProvider::HOME);
    }
}
最初にユーザーモデルに通知を登録してあるので、ユーザー登録後に、引数にユーザーネームを渡して呼び出します。
これでメール通知が完成され、ユーザー登録すると、以下の用に送信されます。
デザインをカスタマイズする
デフォルトのデザインを変更したい場合、cssファイルを変更します。
php artisan vendor:publish --tag=laravel-mail

sail artisan vendor:publish --tag=laravel-mail
resources/views/vendor/mail/html/themes/default.cssファイルのcssを変更でカスタマイズすることができます。

