Laravel BreezeはTailwindCSSとAlpine.js使ってレイアウトされています。TailwindCSSとAlpine.jsとLaravelのBladeの使い方を確認しつつトップページを作成します。
親記事
Dockerで環境構築して Laravel 9で CRUD 機能を作る
2022年03月15日
Laravel環境
- macOS
- Laravel v9.0.2
- Docker 20.10.12
参考サイト
こちらを参考にすると、わかりやすいと思います。
TailwindCSSのチートシートtailwindcomponents
Tailwindのテンプレート TailwindTemplates
トップページを作成する
TailwindCSSのクラス追加を反映するには、その都度 sail npm run dev コマンドする必要があります。デモ、開発環境では、CDNを介して最新のデフォルト構成ビルドします。
<!-- Styles -->
 <link rel="stylesheet" href="{{ asset('css/app.css') }}">
 <script src="https://cdn.tailwindcss.com"></script>
ダッシュボードを参考にナビゲーションバーをトップページ上に対応させていきます。
トップページでトップビューを表示させるためルートを変更します。
Route::get('/', function () {
    return view('top');
})->name('top');
2: views/top.blade.php を指定しています。authディレクトリ内のビューを指定したい場合は、auth.ビュー名を指定します。
3: 名前をつけると、route(‘名前’) でurlを指定することができます。
resources/views/dashboard.blade.php の内容をコピーして、トップビューを新しく作成します。
<x-app-layout>
     <x-slot name="header">
          <h2 class="font-semibold text-xl text-gray-800 leading-tight">
               {{ __('Top') }}
          </h2>
     </x-slot>

     <div class="py-12">
          <div class="max-w-7xl mx-auto sm:px-6 lg:px-8">
               <div class="bg-white overflow-hidden shadow-sm sm:rounded-lg">
                    <div class="p-6 bg-white border-b border-gray-200">
                         {{__('Top')}}
                    </div>
               </div>
          </div>
     </div>
</x-app-layout>
4: {{ __(‘Top’) }} config/app.phpファイル内の ‘locale’ => ‘ja’ を指定している場合、lang/ja.json ファイル内にTop 変数の値が適用されます。値がない場合、Topとそのまま表示されます。
Laravel Langで日本語対応にする
2023年01月10日
LaravelBladeテンプレートの使い方
ビューはlayoutsとcomponentsで分けられて管理されています。レイアウトとコンポーネントの使い方を見ていきます。
レイアウトを読み込む
1-17: <x-app-layout> → レイアウト(layouts/app.blade.php)1 を読み込みます。
2-7: <x-slot name=”名前”></x-slot>名前付きスロットを定義 → app.blade.php 内で、 {{ $名前 }} で表示されます。
8-16: <x-app-layout> 内の名前付きスロット以外 → app.blade.php内で、 {{ $slot }}で表示されます。
スロットのルールはコンポーネントで使う際でも同様に使うことができます。
<body class="font-sans antialiased">
     <div class="min-h-screen bg-gray-100">
          @include('layouts.navigation')

          <!-- Page Heading -->
          <header class="bg-white shadow">
               <div class="max-w-7xl mx-auto py-6 px-4 sm:px-6 lg:px-8">
                    {{ $header }}
               </div>
          </header>

          <!-- Page Content -->
          <main>
               {{ $slot }}
          </main>
     </div>
</body>
3: 別のビューの読み込み、layouts/navigation.blade.php を読み込んでいます。
コンポーネントを読み込む
使用する頻度が高い部分をコンポーネントで管理しています。
<!-- Logo -->
<div class="flex-shrink-0 flex items-center">
     <a href="{{ route('top') }}">
          <x-application-logo class="block h-10 w-auto fill-current text-gray-600" />
     </a>
</div>
4: <x-application-logo> → コンポーネント(components/application-logo.blade.php)を読み込みます。
4: class=”block h-10 w-auto fill-current text-gray-600″ → 属性をコンポーネントへ渡す。コンポーネント内で、 {{ $attributes }} で使用します。
<svg viewBox="0 0 316 316" xmlns="http://www.w3.org/2000/svg" {{ $attributes }}>
    <path d="M305.8 81.125C305.77 80.995 305.69 80.885 305.65 80.755C305.56 80.525 305.49 80.285 305.37
1: {{ $attributes }} で送られてきた全ての属性を使用します。
<x-nav-link :href="route('dashboard')" :active="request()->routeIs('dashboard')">
     {{ __('Dashboard') }}
</x-nav-link>
1: nav-link コンポーネントを読み込みます。変数や式は、接頭辞の : を使用した属性を介してコンポーネントに渡します。
2: <x-nav-link>タグ内の値は、コンポーネント内で {{ $slot }} で使用できます。
@props(['active'])

@php
$classes = ($active ?? false)
            ? 'inline-flex items-center px-1 pt-1 border-b-2 border-indigo-400 text-sm font-medium leading-5 text-gray-900 focus:outline-none focus:border-indigo-700 transition duration-150 ease-in-out'
            : 'inline-flex items-center px-1 pt-1 border-b-2 border-transparent text-sm font-medium leading-5 text-gray-500 hover:text-gray-700 hover:border-gray-300 focus:outline-none focus:text-gray-700 focus:border-gray-300 transition duration-150 ease-in-out';
@endphp

<a {{ $attributes->merge(['class' => $classes]) }}>
    {{ $slot }}
</a>
1: propsディレクティブ → 変数とみなすべき属性を指定します。指定すると、$属性で値を使用することができます。$attributes から除外されます。
3-7: phpディレクティブ → この中では、phpを書くことができます。先程propsで定義した$activeを使ってclassの値を分岐させています。
9: {{ $attributes->merge([‘class’ => $classes]) }} → 全ての属性 $attributes にプラスしてclass属性を追加しています。今回の場合は、active属性が除外されているので href属性と、新しく追加したclass属性が表示されます。
@props([‘active’] => false) とactiveの初期値を指定できます。
Bladeディレクティブ
Bladeビュー内でPHPを書きたい場合、@php @endphp の間に記入することができ、@if @endif などショートカットが用意されてあり、状況に合わせてビューを作成できます。
@if (Route::has('login'))

@else

@endif
@auth
// 認証済み
@else
// 未認証
@endauth
- @php @endphp → phpを表記
- @isset($records) @endisset → $recordsが定義されており、nullでもない
- @empty($records) @endempty → $recordsは空
- @foreach($users as $user) {{ $user->id }} @endforeach → foreach文
- などなど詳しくは、上の参考サイトのBladeテンプレートや公式ドキュメントに記載されています。
これらを使って resources/views/layouts/navigation.blade.php を認証済み、未認証のユーザーに対応できるように変更していきます。
関連記事
ゲートを使ってページの一部を非表示にする方法
2023年01月10日
Laravel<nav x-data="{ open: false }" class="bg-white border-b border-gray-100">
<!-- Primary Navigation Menu -->
<div class="max-w-7xl mx-auto px-4 sm:px-6 lg:px-8">
<div class="flex justify-between h-16">
<div class="flex">
<!-- Logo -->
<div class="flex-shrink-0 flex items-center">
<a href="{{ route('top') }}">
<x-application-logo class="block h-10 w-auto fill-current text-gray-600" />
</a>
</div>
<!-- Navigation Links -->
<div class="hidden space-x-8 sm:-my-px sm:ml-10 sm:flex">
@auth
<x-nav-link :href="route('dashboard')" :active="request()->routeIs('dashboard')">
{{ __('Dashboard') }}
</x-nav-link>
@endauth
</div>
</div>
<!-- Settings Dropdown -->
@auth
<div class="hidden sm:flex sm:items-center sm:ml-6">
<x-dropdown align="right" width="48">
<x-slot name="trigger">
<button class="flex items-center text-sm font-medium text-gray-500 hover:text-gray-700 hover:border-gray-300 focus:outline-none focus:text-gray-700 focus:border-gray-300 transition duration-150 ease-in-out">
<div>{{ Auth::user()->name }}</div>
<div class="ml-1">
<svg class="fill-current h-4 w-4" xmlns="http://www.w3.org/2000/svg" viewBox="0 0 20 20">
<path fill-rule="evenodd" d="M5.293 7.293a1 1 0 011.414 0L10 10.586l3.293-3.293a1 1 0 111.414 1.414l-4 4a1 1 0 01-1.414 0l-4-4a1 1 0 010-1.414z" clip-rule="evenodd" />
</svg>
</div>
</button>
</x-slot>
<x-slot name="content">
<!-- Authentication -->
<form method="POST" action="{{ route('logout') }}">
@csrf
<x-dropdown-link :href="route('logout')" onclick="event.preventDefault();
this.closest('form').submit();">
{{ __('Log Out') }}
</x-dropdown-link>
</form>
</x-slot>
</x-dropdown>
</div>
@else
@if (Route::has('login'))
<div class="hidden items-center px-6 sm:flex">
@auth
<a href="{{ route('dashboard') }}" class="text-sm text-gray-700 dark:text-gray-500 ">{{ __('Dashboard') }}</a>
@else
<a href="{{ route('login') }}" class="text-sm text-gray-700 dark:text-gray-500 ">{{ __('Login') }}</a>
@if (Route::has('register'))
<a href="{{ route('register') }}" class="ml-4 text-sm text-gray-700 dark:text-gray-500 ">{{__('Register')}}</a>
@endif
@endauth
</div>
@endif
@endauth
<!-- Hamburger -->
<div class="-mr-2 flex items-center sm:hidden">
<button @click="open = ! open" class="inline-flex items-center justify-center p-2 rounded-md text-gray-400 hover:text-gray-500 hover:bg-gray-100 focus:outline-none focus:bg-gray-100 focus:text-gray-500 transition duration-150 ease-in-out">
<svg class="h-6 w-6" stroke="currentColor" fill="none" viewBox="0 0 24 24">
<path :class="{'hidden': open, 'inline-flex': ! open }" class="inline-flex" stroke-linecap="round" stroke-linejoin="round" stroke-width="2" d="M4 6h16M4 12h16M4 18h16" />
<path :class="{'hidden': ! open, 'inline-flex': open }" class="hidden" stroke-linecap="round" stroke-linejoin="round" stroke-width="2" d="M6 18L18 6M6 6l12 12" />
</svg>
</button>
</div>
</div>
</div>
<!-- Responsive Navigation Menu -->
<div :class="{'block': open, 'hidden': ! open}" class="hidden sm:hidden">
<div class="pt-2 pb-3 space-y-1">
@auth
<x-responsive-nav-link :href="route('dashboard')" :active="request()->routeIs('dashboard')">
{{ __('Dashboard') }}
</x-responsive-nav-link>
@endauth
</div>
<!-- Responsive Settings Options -->
<div class="pt-4 pb-1 border-t border-gray-200">
@auth
<div class="px-4">
<div class="font-medium text-base text-gray-800">{{ Auth::user()->name }}</div>
<div class="font-medium text-sm text-gray-500">{{ Auth::user()->email }}</div>
</div>
@endauth
<div class="mt-3 space-y-1">
@auth
<!-- Authentication -->
<form method="POST" action="{{ route('logout') }}">
@csrf
<x-responsive-nav-link :href="route('logout')" onclick="event.preventDefault();
this.closest('form').submit();">
{{ __('Log Out') }}
</x-responsive-nav-link>
</form>
@else
<x-responsive-nav-link :href="route('login')">{{ __('Login') }}</x-responsive-nav-link>
<x-responsive-nav-link :href="route('register')">{{ __('Register') }}</x-responsive-nav-link>
@endauth
</div>
</div>
</div>
</nav>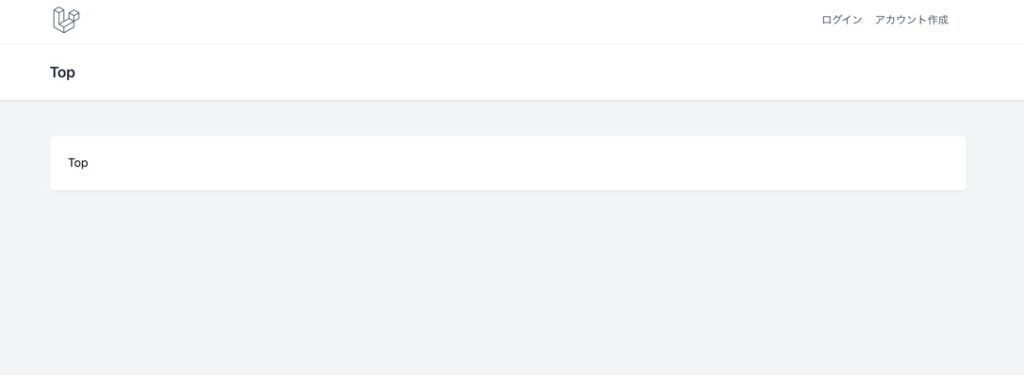
これでダッシュボードのように、トップページをナビゲーションバーに対応できました。

